...

Sunday, February 28, 2010

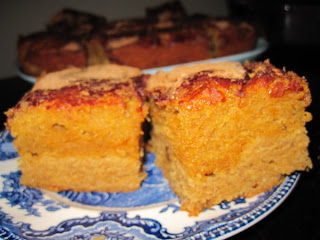
Snickerdoodle Sweet Potato Bars


Necessity is the mother of invention!  These were supposed to be snickerdoodle pumpkin pie bars, but apparently canned pumpkin is a seasonal item (and pureed sweet potato isn't??).  Hello people!  We're in L.A. There are no seasons here!  It would be more accurate to call it a "holiday" item.  If we went by the seasons in L.A. we'd be serving strawberry shortcake and peach ice cream with our Thanksgiving turkeys.  Since when do people only make pumpkin pie during Thanksgiving and Christmas anyways?  The bakery at the grocery store was selling pumpkin pie!  Totally illogical.  Canned pumpkin should be available year-round for bakeholics who want pumpkin pie, pumpkin bread, and snickerdoodle pumpkin pie bars.

Alas, I had to make do with sweet potato.  I guess I wasn't really that inventive, since most people probably can't tell the difference between pumpkin and sweet potato in baked goods anyways (the recipients of my bars were none the wiser).  Personally, I don't think pumpkin tastes anything like sweet potato.  Pumpkin produces a custardy, smooth filling, whereas sweet potato is starchier, and has a slightly ashy taste.  I think the starchiness actually worked to my advantage in this recipe, because I needed to cart the bars to school to bribe my friend, and wobbly custard bars are much harder to transport and handle than sturdy starchy ones.

I borrowed my friend's Planet Earth DVD's last year and only just got around to returning them.  I also borrowed his roommate's favorite DVD set (Rocky) and kept it for a year (I think it's understandable to take an entire year to wade through the entire collection of Rocky DVD's.  Sorry Joe).  Baked goods work really well as a bribe to avoid the loss of DVD-borrowing privileges (with guys, at least. Your girlfriends might accuse you of making them fat.  Your gym-obsessed little brother might also accuse you of making him fat, but he will still eat half of your bars and drink all of your milk, and then he will borrow your car and not put gas in it).  When I handed the bars (and the DVD's) over, I got a delighted high five and the response of, "you should borrow more so we can get more stuff!"  I ran into another friend in the hall with my snickerdoodle bars and he offered to let me keep his DVD's as long as I want if I brought him baked goods.  Haha, I guess I can cancel my Netflix subscription!  These bars were definitely scrumptious enough to do the trick!  (I sampled them before I sent them off, of course).


The finished bars had a pronounced butter flavor, and retained their soft, custard-like texture while being firm enough to cut into small squares (as if I was going to eat just one small square).  The cinnamon-sugar topping took me back to my childhood when I'd slather a river of melted butter on a piece of toasted white bread before burying it in mountains of cinnamon-sugar (no, wait, that was yesterday).  There is something deliciously frivolous and playful about the combination of cinnamon-sugar and snickerdoodle-sweet potato, but despite their cutesy appeal, they are seriously good. 

Snickerdoodle layer 
3 c. all-purpose flour
2 t. baking powder
1 t. salt
2 c. packed dark brown sugar
1 c. softened butter
2 eggs
1 T. vanilla

Sweet-potato layer
1 c. sugar (white, granulated)
1/2 c. softened butter
2 eggs
1 1/2 c. pureed sweet potato (pumpkin works too)
1 c. all purpose flour
1 t. baking powder
1 t. salt
1 t. pumpkin pie spice

Cinnamon-sugar topping
2 T. sugar (white, granulated)
2T. cinnamon

Preheat the oven to 350.  Butter a 9x13 in. baking pan, and lay a piece of parchment paper across the middle (for easy bar removal).   

Make the snickerdoodle layer: sift the flour, baking powder, and salt together in a medium bowl, and set aside.  Cream the butter and sugar in a large bowl.  Add the eggs and vanilla, and beat until the mixture lightens and becomes fluffy.  Stir in the flour mixture until well blended (batter will be thick) and spread in the bottom of the prepared pan.

Make the sweet-potato layer: in your large bowl (no need to wash out the snickerdoodle remnants), beat together the softened butter and granulated sugar.  Mix in the sweet potato puree and the eggs.  In the medium bowl (that previously housed the snickerdoodle flour-mix) whisk together the flour, salk, baking powder, and pumpkin pie spice.  Add the dry mixture to the pumpkin mixture, and beat on low speed until thoroughly mixed.  Spread the pumpkin batter over the snickerdoodle batter in the pan.

Make the cinnamon-sugar topping:  in a small bowl, whisk together the cinnamon and sugar.  Sprinkle mixture evenly over the surface of the batter. 

Bake for 40-50 minutes, or until a knife inserted into the center comes out clean.  You might want to check at 35 minutes in case you have a miscalibrated oven (nothing worse than burned bars!).  The bars will puff up as they cook, and if they do not looked puffed then don't bother poking them; they're not done (wet, sloppy bars might actually be worse than slightly overcooked ones...).  Let the bars cool for about an hour before you cut them.  Don't worry!  They will still be warm and moist.  Devour at your leisure, or use as bribes.

Tuesday, February 23, 2010

Stolen Secret Cheesecake

Loosen up those morals! All is fair in love, war, and baking.  Besides, I didn't actually steal the recipe, I just copied it down on the sly... it did not involve snooping around through my roommate's room or thinking of excuses to go upstairs and "say hi" in an effort to ascertain the location of the coveted recipe...  Who actually has a secret recipe anyways??? The whole point of baking is sharing!

This is definitely one of the best classic cheesecake recipes I've come across (although I'm not sure what the big deal was, since it seems like a fairly ordinary recipe on its face), and it's pretty much foolproof.  Trust me, if my crazy ex-roommate could make it, you can.  He cooked some of the worst food I've ever had the misfortune to taste.  For example, his gag-worthy rendition of pasta shells with cheese reminded me of festering pimples.  I'm serious!  The first bite seemed to pop in my mouth, and lukewarm, grainy cheese oozed from the rubbery shell.  I excused myself discretely to spit it out.  He also kept a vat of "recycled," a.k.a. never-replaced-ever, cooking oil on the kitchen counter at all times, and burned everything from shrimp to banana fritters in it!  I'm sure it must have been some kind of fire hazard.  I would definitely nominate him for that "Worst Cooks in America" show.  Despite his dubious cooking skills, he thought he was an amazing, chef extraordinaire, and was constantly bragging about his innovative recipes and culinary prowess.  He was a "talker."  My other roommates and I would get stuck listening to him rant for hours, powerless to so much as hint that we (urgently) needed to be somewhere (anywhere!) else.  So when he bragged to me about his super-secret, best-in-the-world cheesecake recipe, I was nonplussed.


Finally, after months of listening to him boast about the mythical cheesecake, I entered our kitchen one day to find him madly mixing an array of cheesecakey ingredients.  I approached and asked what he was making, and he immediately snatched his dirty little index card up off the counter, lest I catch a glimpse of his precious secret recipe, and leered at me.  "I'm making my secret cheesecake," he said, his nasal tone tinged with pride.  "Oh, great." I replied, "You'll have to let me try some."  He turned his back to me, shielding his batter.  "Hmph, it has to age two days." he muttered.  What?? Age?? It's cheesecake not cheese!  I thought.  But I ignored him and excused myself before I got trapped.

Sure enough, the mysterious cheesecake sat wrapped in the back of our fridge for two whole days.  It looked magnificent beneath it's glossy plastic-wrapping, and I despite myself, I became wildly curious.  At the end of the second day, I waited with bated breath (for once) for my roommate to come home and allow me to sample the fabled cake.  He so very-kindly obliged me a hair-sized slice, but every wispy bite was flawlessly creamy, dreamily rich, and oh-so-over-the-top.  I had to have that recipe!  And now, I do.  And I would like to share it with you.


Enjoy!!!!

I added a traditional graham cracker crust because the secret recipe just called for "any crust."

Graham Cracker Crust
1.5 c. crushed graham crackers
1/4 c. sugar
1/2 t. cinnamon
1/4 c. melted, unsalted butter

Preheat the oven to 400.  Butter a 9-in spring-form pan (you can use any size, but the cooking time may vary and you might have extra batter if you go smaller).  In a medium bowl, combine the graham cracker crumbs, sugar, cinnamon, and melted butter until combined and evenly moistened.  Pour the mixture into the spring-form pan, and press it along the bottom and up the sides of the pan.  Bake about 10 minutes.  Reduce the temperature to 350 (cheesecake is forgiving at lower temperatures - I cooked mine at 300 by mistake with no adverse results - but don't accidentally cook it on 400 or it will be dry and very, very disappointing).  Let the crust cool and prepare the cheesecake.

Secret Cheesecake
4 pkgs (the ones that look like bricks) cream cheese
pinch of salt
5 eggs
1 c. + 2T. sugar
3/4 c. sour cream
2T. vanilla

Topping
1 pint sour cream
1/2 c. sugar
1t. vanilla

Make sure the oven is set to 350.  Beat the cream cheese and salt until fluffy.  Add three of the eggs, one at a time, beating well after each addition.  Beat in the 1c. + 2T of sugar.  Add the other two eggs, one at a time, beating well after each addition.  Finally, add the 3/4 c. sour cream and 2T. vanilla and mix well.  Pour the batter into the prepared crust and bake 45 - 60 min.  The cheesecake should be set at the edges but still jiggly through the middle.  Check it at 45 minutes, and if it looks really watery still, put it back in and keep checking every 10 minutes until you are satisfied. 

While the cheesecake bakes, stir together the topping ingredients.  As soon as the cheesecake is set to your satisfaction, take it out of the oven and immediately pour the topping into the pan, over the cheesecake.  Spread the topping evenly, and return the cheesecake to the oven for an additional 5 minutes.  Remove the cheesecake from the oven, and let it cool completely on the counter-top.

Here is the weird part.  When the cheesecake has cooled completely, wrap it in plastic or cover with tinfoil (mostly to protect it from funky fridge smells) and stick it in your fridge.  Leave it there for two days.  I know this will take willpower, but do it.  This must be the secret part of the recipe because I've never heard of this step before.  The longest I ever chilled my cheesecakes was overnight, and usually I can't beat my family away with my spoon for even that long!  But who am I to challenge the mysterious secret recipe?  I left this one for two days, as instructed, and it turned out fabulous.  If impatience gets the better of you, let me know how you fare!


Dedicated to my fellow Food Whores, and partners in crime.  You know who you are.

Wednesday, February 17, 2010

Chocolate Chocolate Mayonnaise Cake

Wipe that grimace of disgust off your face!  Would I really be posting this recipe if it was gross?  I assure you I am 100% anti-mayonnaise.  I think it is the most disgusting supposedly edible substance you could ever put in your mouth.  I can't even stand to be near a jar unless it is completely sealed, with no crusty or quivering mayo creeping over the edges (ugggh shiver of disgust).  I practically had to don a biohazard suit to prepare this recipe, but I was determined to conquer the mayo cake!

If I hate mayonnaise so much, you ask, why did I feel compelled to spend hours ruining a cake with it? (Not so fast, the cake is damn good).  Pure, morbid curiosity.  I've never been able to resist the urge to teeter out onto the culinary limb.  Normal is boring, as I always say!  This recipe really isn't all that "out-there," though.  Unsubstantiated sources tell me that this cake is some kind of Southern favorite (Southerners, correct me if I'm wrong).  Others claim it is a throwback to the depression era (when people couldn't afford butter, but had plenty of sugar, chocolate, and eggs?  Hm, sounds fishy...).  Whatever the origins of mayo-cake may be, the Internet is rife with recipes for it.  Several recipes even call for a chocolate-mayo frosting, but I drew the line there.  While I managed to wrap my mind around the idea of mayo in a cake (it's just oil and eggs, juuuussst oil and eggs.  Every cake has a variation of oil and eggs!  Plus, the oven cooks it alllll away) thinking about globs of raw mayo, wiggling and jiggling on top of the cake, gave me the willies.  Oh god, that is just revolting.  I'm going to gag.  Let's change the subject - back to delicious cake!
 
Chocolate and mayo... match made in Heaven?

The worst thing about making this cake was that I repeatedly had to remind myself NOT to lick the batter off the spoon.  HORROR!  I cannot begin to tell you how grossed out I would be if I ate raw mayo mixed with chocolate and sugar.  Barf.  That being said, a good cook tastes her food along the way to learn about the flavors that make up the final product, so I will admit that I took a tentative, minuscule lick (more of a poke with the tip of my tongue, really) off the end of my spatula after I'd poured the batter into the pans.  And it wasn't horrible!  It tasted like regular chocolate cake batter, and the batter actually looked really appetizing.  It was smooth and glossy, and deeply chocolaty.  MMMM I wish it hadn't had mayonnaise in it so I could've licked the bowl!!!!  Even though the batter tasted fine, I wasn't willing to risk accidental consumption of unmodified mayo.  I'm was sure that a sinister, unmixed mayo-blob lurked somewhere in the dark folds of the batter, waiting to ambush my tongue.  Shudder!!!  Besides, I knew I would consume enough frosting and ganache to make up for lost batter.  It took every iota of my willpower to avoid gobbling up the frosting like chocolate pudding. 

Don't be fooled by the gloppy, attack-of-the-blob appearance of the partially completed cake.  The gloppy, globby mess gets more recognizable with every step of the recipe, and then... viola!  The sleek slice.  The masterpiece!  The ugly mayo duckling becomes a delicious chocolate swan.  Of course, I had to trick my sister and roommate into eating this devilish dessert ("What?  No, I have no idea who put an empty bottle of mayonnaise in the trash with the empty box of sugar, chocolate chip package, and butter wrappers.  How peculiar..."), and I'm strategically posting this AFTER they've succumbed, muah haha!  And succumb they did.  They salivated and watched eagerly as I cut the cake's chocolate cloak.  They oohed and ahhhed at the superior moist interior, the glossy frosting, and the gown of ganache.  They fell upon their unctuous confections and the room lapsed into silence, punctuated only by an occasional, blissful, "mmmmmmmm."  No other "M" word was mentioned.

Bottom line: the cake was a happy accident, and I will definitely make it again.  In fact, it was one of the best chocolate cakes I've made!  The sea-salt sweetness of the butter frosting is a perfect counterpoint to the bittersweet ganache, and that moist, dark mayo-cake holds its own.  I know which recipe I'm making next time someone wants chocolate cake! (You just made a mental note to yourself not to ask me for chocolate cake, didn't you?  Mistake!!! It's sooo delicious I promise).

For the cake:
2 c. all purpose flour
3/4 c. unsweetened cocoa powder
1 1/4 t. baking soda
1/4 t. baking powder
1 1/3 c. sugar
1/3 c. dark brown sugar, packed
3 eggs
1 t. vanilla
1 cup of wiggling jiggling disgusting mayonnaise
1 1/4 c. water
1 T. brandy

Preheat the oven to 350.  Butter two 8 in pans (or two 9-in pans) and dust with flour.  In a medium bowl, whisk together the flour, cocoa, baking soda, and baking powder.  In a large bowl, beat the white and brown sugars together with the eggs and vanilla until light and fluffy.  Add the whole cup of mayo, and beat until incorporated.  In a small bowl, stir together the water and brandy.  Alternate adding the flour-mixture and the water-mixture to the egg batter, starting and ending with the flour-mixture.  Pour batter into pans and bake 30-35 min, or until a knife inserted into the center of the cake comes out clean.  Allow the cake to cool 10 minutes, remove from pans, and cool completely.

While the cake cools, make the ganache.

Ganache
1 1/4 c. heavy whipping cream
12 oz bittersweet chocolate chips

Combine the chocolate and the cream in a saucepan.  Stir continuously over low heat until melted and glossy.  Set aside to cool, and start the butter frosting.


Butter Frosting
2 sticks unsalted butter, softened
Sea salt or other coarse salt (I had a sea salt grinder, and used a turn's worth of salt)
2 c. powdered sugar
8 oz semi-sweet chocolate chips

Melt the chocolate chips in the microwave (or place in a metal bowl set over a pan of simmering water if you lead an inconveniently microwaveless life like me).  Allow the chocolate to cool to room temperature before continuing.  Whip the butter, salt, and powdered sugar together with an electric mixer until light and fluffy.  Add the cooled chocolate and whip until incorporated.

Get ready to assemble!  We're going to be pouring chocolate over the cake. This can be kind of tricky if you don't have the right tools, but soldier on with your make-shift setup and you'll be fine.  If you have one, place a metal cooling rack inside a cookie sheet with raised sides.  If you have neither, try to find something else that will prevent your table from getting covered in chocolate.  I covered the bottom of a brownie pan with tinfoil, and then put a tinfoil "wall" all around the pan to catch the chocolate ooze.  Put one cake round on your cooling rack/brownie pan setup.  Frost the top and the sides of the cake round with butter frosting.  Top with the other cake round, and use the rest of the butter frosting to cover the cake.  Put the cake in the fridge for 20 minutes to let the frosting set.

Remove the cake from the fridge.  Stir the ganache to break up any skin that has formed, and heat briefly if necessary.  The ganache should be at room temperature, and should have the consistency of loose pudding.  Pour about half of the ganache over the cake, letting it ooze over the top and down the sides.  Use a spatula to guide the ganache over as much of the cake as possible.  Slowly pour the remaining ganache over the cake, again letting it ooze its way down the sides.  Gently smooth the top with your spatula to coax the ganache to drip and drizzle in attractive drops down the sides of the cake.  Set the whole shebang in the fridge and let it set for 20 minutes more.  Remove from the fridge and use the biggest metal spatula you can find to lift the cake off of the cooling rack/brownie pan, and set it on a plate.  Decorate with something pretty (all they had at Whole Foods was a bag of sub-par caramel hearts.  Next time I'm getting Lindt truffles and cutting them in half, and putting truffle halves around the border).  Mmmmmmmayonnaise!!!

Thursday, February 11, 2010

Blueberry Muffin Bread

Blueberry Muffin Bread: A Cinderella Story.  Once upon a time, there was a man who hated butter.  (Insert screeching-to-a-halt noise).  Rewind!  Repeat!  Hates butter?  Who could possibly hate butter?  That was my reaction.  Apparently, along with the small minority of strange people who hate chocolate and cheese, there are those who detest the rich, fatty-glory that is butter.  My depositions professor is one of those misguided souls (He also hates cheese!!! Gasp!).  His casual utterance of this fact shocked me, and I was sure I had misheard him.  He might as well have said, "I hate kittens and butterflies!  I hate summertime and popsicles! I'll have some delicious cake, but hold the delicious."

I rationalized that perhaps he has a health-conscious outlook on life, but Prof. seems like a decidedly straightforward person.  He would have said, "I love butter but I choose cardboard."  Plus, he seems more into burgers than beer tofu and acai.  I decided I needed to bake something and bring it to class to test his exaggeration factor.  Something nice and buttery... Cookies!

So... obviously, the title of this post is NOT "buttery cookies."  I did start out with a cookie recipe, though unbeknownst to me it was the WORST cookie recipe EVER.  I should have known that the ill-fated cookie recipe (Grandma's sour cream delights or something of the sort) was a dud.  The cookies looked plain and buscuit-like in the photo, and the recipe suggested I spread them with jam - obviously to distract the eater from the fact that they have no flavor.  I moved on in search of something more promising, but alas, I could find no other cookies calling for the sour cream (with its fast approaching "use by" date) in my fridge.  Being a stubborn person, I proceeded to bake Granny's questionable cookies instead of opting for a more fitting pastry genre (sour cream coffee cake, duh).  After whipping up the dough (yum!), I put a small batch in the over, and popped the rest in the fridge to wait its turn.  Fast forward ten minutes.  Pull cookies from oven.  Remove from sheet.  Bite into piping hot... blandness?  Another bite to make sure... Dang it!!!!.  Dry, stiff, bland, gross.  No cookies for depos class.  No cookies going to the ball (to carry the strained Cinderella metaphor).  Maybe Granny was senile and penned the wrong recipe to poor grandchild.  Or maybe her taste buds departed with her youth (what's the grand-kid's excuse?).  Whatever the reason, I now had a huge bowl of dough languishing in my fridge.  But I wasn't ready to admit defeat! 

I turned to Paula Deen for help.  Drawling, y'all-ing Paula Deen is the queen of all things gooey, decadent, and BUTTERY.  She kind of looks like a fairy-godmother... If anyone could've save my withered sand-pucks, it was her.  Sure enough, a recipe for Paula's pound cake inspired me to doctor my dough.  With just two cups of sugar and four more eggs I had a cure.  Despite over-mixing (cardinal baking sin!), random extra ingredients, and a highly unorthodox preparation, my dough metamorphosed into a fluffy, sugar-crusted, blueberry studded treat!   Glamorous!  (For a realistic idea of the results, picture Duncan Hines blueberry muffins in loaf shape).  Although I can now live Happily Ever After, my muffin bread, sadly, will not get to go to the ball (i.e. depos class).  Too hard to serve and other plausible excuses.  I'm eatin' the whoooole thing!

Blueberry Muffin Bread

3 c. sugar
1 c. softened butter
1 T. vanilla
1 c. sour cream
6 eggs
3.5 c. flour
1 t. salt
3/4 t. baking soda
3/4 c. fresh or frozen blueberries (I used about a handful of frozen wild blueberries)

Preheat the oven to 325.  Butter two loaf pans or one 10-c. tube pan, dust with flour.  Cream the butter and sugar, and then mix in the sour cream, vanilla and eggs until well blended.  In a separate bowl, stir together the flour, salt, and baking soda.  Add the butter mixture to the flour mixture and stir until just combined.  Fold in the blueberries (avoid mashing unless you want ugly gray bread).  Pour into pan(s) and bake 1 hr and 20 min, or until dark-golden.  A knife inserted into the center of the bread should come out clean.