...

Wednesday, January 27, 2010

Avocado Chocolate Chip Quick-bread


The (future) avocato experiments with avocado!  Plenty of naysayers attempted to stifle my creative inspiration, and claimed my half-baked plan would birth the Frankenstein of breakfast breads.  Oh ye of little faith!  When was the last time I baked something inedible? That's what I thought.  Much like the misunderstood monster, my Franken-bread isn't a looker like it's tall, golden, banana blessed cousin.  It has a greenish cast and a sunken middle, but its physical imperfections conceal a soft, tender crumb, gilded with gooey chocolate.  If we can accept and adore carrot cake and zucchini bread why not avocado quick-bread?  The avocado can hold its own against the garish carrot or tedious zucchini any day.  Like the banana (the familiar and celebrated star of America's favorite quick-bread) the avocado is mild, creamy, buttery, and slightly sweet.  The avocado likes to associate with vegetables, but it is a fruit (well, according to University of California's Avocado Information page it's a very large berry...), and it's high time the avocado joined the ranks of other fruits in breakfast and dessert recipes!  And I'm not just talking about the garnish on huevos rancheros.  I do have to admit that I don't envision myself making avocado cobbler anytime soon so maybe we can just ignore the Avocado Information page and pretend an avocado is not a berry.


The Obscure Avocado

The more I thought about the similarities between avocados and bananas, the more obsessed I became with concocting an "avocadoey" version of banana bread.  My original plan was to bake my favorite banana bread recipe and substitute an equal amount of avocado for the banana.  It hadn't even occurred to me that there might be a legitimate avocado quick-bread recipe out there already!  Turns out there are quite a few, so I decided to conduct a taste-test bake-off: My recipe v. the Internet!  In the end I adapted both recipes to fit my own specifications, so I'm taking full credit for the deliciousness of either result, and blaming any failures on inherent flaws in the pre-adapted recipes (obviously, ha ha).


Battling breads


My banana bread adaptation wasn't as pretty as the "real" avocado bread, but I liked it better.  The taste volunteers couldn't agree on a hands-down winner, so I'm posting both versions.  Both were admittedly... different.  But really yummy!  We should all know by now that "different" is not a synonym for "bad."  So get over your prejudice against avocado desserts, and give one of these recipes a try.  If you can't bring yourself to serve Franken-bread at your afternoon book club meeting, you could wait until Halloween.  Its oddball color and unconventional flavor will blend in with the other kooky treats, and you can pass yourself off as festive instead of freakish - next to all the other ghoulish goodies, no one will notice your misbegotten monster.


Avocado Chocolate Chip Quick-bread I (Banana bread adaptation):

Preheat the oven to 350.  Butter and flour one loaf pan.

Cream 1 c. sugar with 1/2 c. softened butter.  Add two eggs and mix well.  In a separate bowl, stir together 1 and 1/4 c. flour, 1 t. baking soda, and 1/2 t. salt.  Add 1 1/2 c. mashed avocado to the egg mixture and mix well.  Add the wet ingredients to the dry ingredients and mix until just combined.  Stir in 6 oz. bittersweet chocolate chips.  Pour batter into greased pan and bake until a knife inserted into the center of the bread comes out clean (1 hr- 1.5 hrs).

Avocado Chocolate Chip Quick-bread II (spiced version):

Preheat the oven to 350.  Butter and flour one loaf pan.

Cream 1 c. sugar with 1/4 c. softened butter.  Add two eggs and mix well.  In a separate bowl, stir together 1 and 1/3c. flour, 1 t. baking soda, 1/2 t. baking powder, 1/2 t. salt, 1/2 t. cinnamon, and 1/2 t. allspice.  Add 1 and 1/2 c. mashed avocado and 1/4 c. buttermilk to the egg mixture.  Stir the dry ingredients into the wet ingredients until just combined.  Stir in 6 oz. bittersweet chocolate chips.  Pour batter into greased pan and bake until a knife inserted into the center of the bread comes out clean (1 hr - 1.25 hrs).

Don't knock it 'till you've tried it!

Sunday, January 24, 2010

Delicious Snack


Ciabatta Ricotta Burrata Nutella Dulce Grilled Sandwich. 

That was too long for the post title.  I tend to focus my posts on baking and dessert, and this delicious snack (ok, it was really my dinner) fits neither of those categories, but it weaseled its way in after my sister heard the tantalizing sizzle of butter in the pan, caught me licking a golden drop of dulce off my finger, and asked what I was making.  I got halfway through the description of my meal ("Ciabatta ricotta burrata nutella...") before my voice trailed of sheepishly and I realized I had crossed the line of food-weirdness.  Her mouth dropped in disbelief and her eyes devoured the crusty, oozing, buttered sandwich as I carried it to my seat.  "Can I have a bite?"  She asked hopefully.  At that moment I knew my mad-hatter recipe had to go on the blog so the world could indulge in my hedonistic treat. 

This glorified grilled cheese sandwich will only work with top-quality ingredients, which I suggest you obtain from a good Italian deli.  I am lucky enough to live a hop-skip-and a jump away from Bay Cities Deli - the Willy Wonka of Italian delis.  My favorite snack ever is a torn chunk of hot Bay Cities bread, slathered with dulce de leche and topped with gooey burrata or fluffy ricotta.  I was inspired by a recent streak of grilled cheese dinners to transform my regular impromptu snack into a respectable sandwich (although I admit that a sandwich filled with chocolate and caramel sounds more frivolous than respectable...), melted and griddled to perfection.  If you live anywhere in West L.A. and have not yet sampled the fresh cheeses and breads from Bay Cities, or their marvelous sandwiches, you're deprived and I feel sorry for you. 

Ingredients 

1 loaf of freshly baked ciabatta bread
1 jar Nutella
1 jar dulce de leche
1 tub fresh ricotta cheese
1 tub of burrata
2 tsp. butter
(obviously you won't need the whole loaf/jar/tub of each of these ingredients... or maybe you will!)

Saw off a large hunk of ciabatta, and split down the middle to form a future sandwich.  Spread your desired amount of ricotta on one half of the bread, and top with burrata.  Remember, the burrata and ricotta are going to melt out the sides of the sandwich, so go easy!  On the other half of the bread, spread a thick layer of Nutella, and top with a thick layer of dulce de leche.  Press the Nutella-dulce half down on top of the cheesy half.  Heat the butter in the frying pan until it sizzles and bubbles, then press the sandwich into the golden butter-foam.  Grill on medium-low until the cheese melts and the sandwich is heated through.  I cheated and used the toaster oven after a few minutes to get mine really toasty, but for the more patient folk, covering the frying pan will help trap the heat and get your delicious snack ready lickety-split.

Saturday, January 23, 2010

Lemony Pound Cake Doom


Cake is a dangerous thing.  This cake is pure evil.  Like an ancient Latin manuscript that invokes demons when unearthed, my friend and I came upon this recipe buried amidst equally intriguing blogged recipes.  It once occupied an honored place amongst the glossy pages of Rose's Heavenly Cakes, but this fallen angel has been warped and adapted into the cake Siren.  Warm from the oven, golden and piquant, soft, and irresistibly moist... you will be doomed.

My equally food-obsessed friend and I concocted this recipe in conjunction with a recipe for lemon meringue pie, and the evilness of the cake recipe asserted itself even before we began baking!  Some malevolent hand guided us to pick a horrible pie recipe involving corn starch (as a bona fide foodie, I am ashamed to admit I made a custard pie containing cornstarch), and NO SUGAR.  Somehow, probably because we were distracted by the evil pound cake recipe, we failed to notice that the pie filling contained not one iota of sugar.  We baked the entire pie, and only noticed when we sampled our creation that something had gone horribly wrong.  It might've made a nice sauce for a chicken dinner, but under a mound of meringue it was just plain gross.  The lemon pound cake obviously stole the show.  If cakes could cackle, ours would have.
 

Naked Lemons

Cake Ingredients

2 eggs
1 egg yolk
3/4 c. sour cream, plus one T. sour cream
2t. vanilla
2 1/2 c. all-purpose flour
1 1/4 c. sugar
1 1/2 t. baking powder
1/2 t. baking soda
1/2 t. salt
2 T. lemon zest
14 T. unsalted butter, softened

Lemon Topping

1/2 c. sugar
6 T. lemon juice

Butter and lightly flour 10 c. tube or bundt pan.  Preheat the oven to 350.  In a medium bowl, whisk the eggs, egg yolk, 1/4 c. of the sour cream, and the vanilla.  In a separate, larger bowl, combine the flour, sugar, baking soda, baking powder, salt, and lemon zest.  Add the butter and remaining sour cream, mixing on low speed until just moistened.  Increase speed to medium and beat until the mixture lightens in color and becomes fluffier.  Scrape down the sides of the bowl.  Reduce mixing speed to low, and add half of the egg mixture, beating until incorporated.  Add the rest of the egg mixture, and beat on low until incorporated.  Spread the batter evenly into the pan, and bake for 45-55 min.  The cake is done when a knife inserted in it's center comes out clean.  Meanwhile, make the lemon topping:

In a small saucepan, mix the lemon juice and sugar over medium heat until the sugar has dissolved.  Do not allow the mixture to boil.  When the cake comes out of the oven, skewer it or stab it all over with a knife (sounds so evil!) and drizzle with half of the lemon topping (ouch! lemon on stab wounds!).  Unmold the cake (using a springform mold came in handy- no need to wait for it to cool!) and drizzle with the remaining syrup.  Torture yourself by waiting until the cake is cool enough to handle, or devour the steaming cake immediately and sacrifice your tongue and lips for its melting texture.

Tuesday, January 19, 2010

Butter

When I was in kindergarten our class made butter from scratch.  We took turns churning heavy cream throughout the class period until the cream became thick, and we spread it on graham crackers for snack time.  Now that I've actually made butter from scratch, I realize that the kindergarten concoction was really over-whipped cream, but the memory of eating our own creamy creation has stayed with me and inspired me to try the real deal!  This recipe is a great way to use up that extra whipping cream sitting in your fridge.  Supposedly you can use cream that has begun to turn, but I think that sounds kind of gross and I recommend using delicious fresh cream.  There is something satisfying about crafting basic ingredients by hand.  I like to get carried away and imagine life as a local dairy farmer churning out fresh butter and specialty cheeses to sell to foodies around the world!  Luckily, you don't have to be a dairy farmer to make your own butter (or your own cheese, but that will be a future post).  Read on!

Ingredients

Heavy cream (any amount - I used about a cup)
Ice water (for washing)
1/4 t. salt per cup of heavy cream (if you want salted butter)

Beat That Butter!

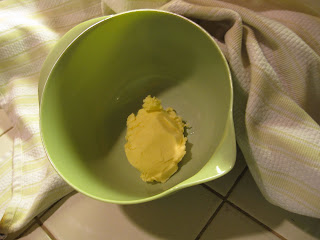
Place the heavy cream in a bowl and whip on high speed.  You can use a hand mixer or a stand mixer, but if you have one I recommend using the stand mixer with a splash guard.  I only had a hand mixer, so I enlisted a volunteer to hold a towel around the bowl to prevent the cream from flying all over me and my kitchen.  Keep whipping the cream.  Keeeeep whipping.... The cream will pass soft peaks, firm peaks, curdled stage....keep it up... At between five and ten minutes the cream will "break," i.e. it will separate into a solid and a liquid: butter and buttermilk!  Whip a minute or so past the break, and then take a spatula and press the butter into one large ball.  Squish it against the side of the bowl to remove as much buttermilk as possible, and then carefully pour the buttermilk into a separate container (save for use in pancakes!). 


Now you need to wash the butter to remove the rest of the buttermilk residue.  You can eat the butter without washing it, but it will last much longer if you follow this washing procedure: pour some ice water into the butter, and mix on high speed for a minute.  The water will become cloudy.  Pour the cloudy water down the sink and repeat until the water is relatively clear.  Squish the butter to get as much water out as you can, pour it off, and add the salt.  Mix on low speed to incorporate.  Viola! Fresh salted butter for your butter crock!